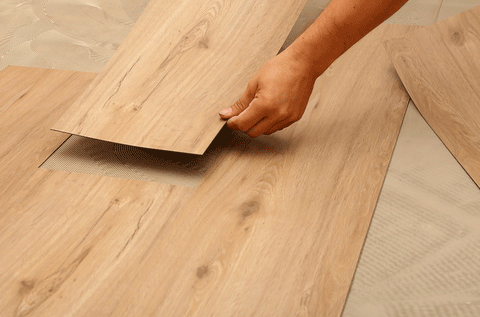
LVT or Luxury Vinyl Tile is currently the fastest growing floor covering in the world. It is a great choice for anyone who wants a practical floor that is easy to install and looks stylish. Before laying your new floor, however, there are a few things to do to get everything ready.
Floor Preparation
One of the most important stages of any click vinyl flooring installation is site prep. Remove all furniture from the room and then brush and vacuum the sub-floor. For LVT a key factor in site preparation is checking the level of the sub-floor. Take time to look for any unevenness in the surface. This could be nails, lumps of concrete or generally anything that would obstruct the LVT from being laid perfectly flat. Also, test for dips or humps in the sub-floor using a long straight-edge such as a spirit level. Place it in multiple areas of the room and get down low to look for any potential dips or humps. Anything over 2mm in a 1-meter run should be levelled out using a suitable floor levelling compound.

Acclimatise Your Flooring
You must acclimatise your flooring. To do this, leave the closed boxes of flooring in the room where you are planning on fitting it for 48 hours. Ensure that the heating conditions are normal for the room so that the boards will be able to react to the living environment before they are installed. This will reduce movement after installation which can cause problems further down the line. LVT flooring can be fitted above underfloor floor heating, provided the temperature does not exceed 29c. It is best to speak with your flooring provider as a different type of adhesive may be needed for dry-back (stick-down) or underlay for click.

Underlay
It is important to only use an LVT underlay. Other types of flooring underlay can often not provide the correct support for the click joints of a luxury vinyl tile. Most LVT underlay is a high-density 1mm-1.5mm thick foam with a moisture barrier. It is also possible to use self-adhesive vinyl tile underlay, which is excellent for all LVT flooring due to its strong construction and anti-slip nature, often making installations easier and stronger. Roll out the underlay at a right angle to the direction the floor is being installed. Laminate underlay is NOT suitable for LVT flooring and will cause post-installation issues.

Installing Click LVT
Install the entire length of the first row, before connecting the next row. Start with a 1/2 board. Cut a board by scoring with a Stanley knife on the surface and then snapping it off. Use a set square to ensure a straight cut. The female parts of the click system should be facing away from the wall. The end joints must be installed first. With the female click in place on the ground, insert the male click system. Start at a 45-degree angle and gently push flat. Continue until the entire row is installed and ensure the joints are flush. You may need to cut the last board.
Start the second row with a full board which will ensure that the joints are staggered. Click all the plank ends of the second row together in the same way, keeping this row close to the first row. Ensure the male end is pointing towards the female end of the first row. Once all the short ends are joined, gently angle the entire second row into the first row and press into place. Continue across the room until the entire floor is covered.
Naturally, some boards will require cutting. Mark the cutting line of each board on the reverse side and cut 7-10mm back from the wall or object you are fitting against. This will ensure that the correct expansion gap is maintained. Just use your knife to cut the boards as required.

Installing Dryback LVT
First of all, you will need to determine the installation direction of the LVT floor and work out how the partition of plank or tiles will be across the width of the room. You will then need to mark a straight line on the floor. Highlight the second line so creating the section (for example, 5 rows wide) to be glued with the correct type of adhesive. Spread the right amount of adhesive evenly over the sub-floor and let it tack-off until it reaches its initial bonding strength. Lay the planks or tiles, observing the direction of the arrows of the backing, into the tacked-off
adhesive, to transfer the adhesive fully onto the backing. Cut the planks or tiles, free of tension, against the wall or skirting. Do not spread adhesive on a section greater than can be processed within the working time. To ensure full contact with adhesive, immediately press every plank or tile with a rubbing block or hand roller. Wipe excess adhesive with a damp cloth. Immediately roll each section with a flooring roller (should be a minimum of 50kg). Roll several times, in different directions, during the adhesive working time. Repeat this process until completed.
It is highly advised to use a specialist fitter to install (particularly dryback) luxury vinyl.

Love-Rugs a leading supplier of LVT flooring based in Glasgow with a huge selection from different designers such as Moduleo, Lifestyle floors, Amtico and more. Contact Love-Rugs for help and quotes on different types of LVT today.